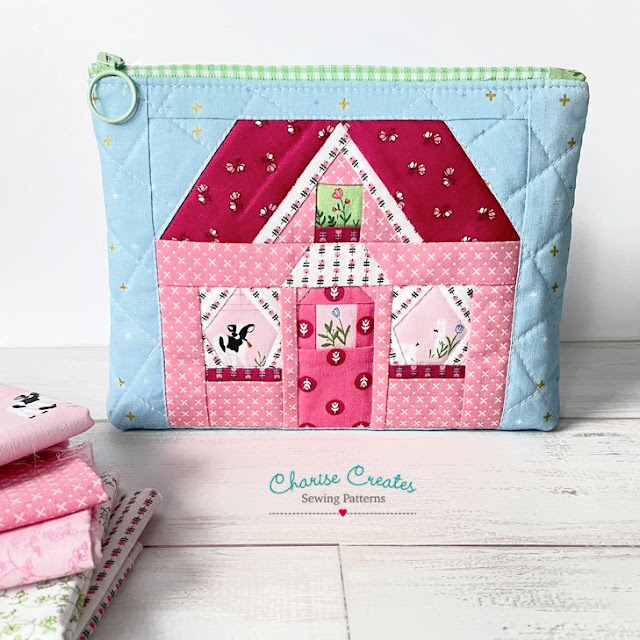
The first pouch I made uses my Free Tulip paper piecing pattern for the focal point on my "Home Sweet Home" boxy zipper pouch. The zipper pouch can also be used to hold fat quarters : )
Find the Tulip pattern [HERE]
Find the Home Sweet Home Boxy Zipper Pouch [HERE]
The fabric line is perfect for fussy cutting. Those rabbits and cows are just adorable!
I love the zipper charm from at Sew Be!
On the back of the Boxy Zipper pouch I used "Pink Flower Fields" print.
The pouch is a free pattern you can find at the bottom of this post!
If you make any projects with Tulip Cottage fabric be sure to tag your photos on social media with the hashtags:#ILoveRileyBlake #RileyBlakeDesigns #TulipCottageFabric
I love to see what you make : )
Happy Sewing!
xo
Charise
6" Quilt Block Zipper PouchFind the Pattern [HERE]
Notes: ~All seam allowances are 1/4".
Back stitch at the beginning and end of each seam.
Finished Size: 6" tall x 8" wide
Materials:
~ 6" finished / 6 1/2" unfinished quilt block
~ 1/4 yard shell fabric
~1 - 1" x 1 1/2" Print for the zipper tab
~ 1/4 yard lining
~ 1/4 yard batting
~ 1/4 yard muslin or canvas
Supplies:
~Zipper Foot
~Matching Thread
~Pins
~9" or longer coil zipper
~Marking pen, pencil or Hera Marker for quilt marking
Cut:
~ Shell (background) Fabric: 2 - 6 1/2" x 2 3/8" rectangles, 1 - 1 1/4" x 8 1/2" , 1- Main Panel
~Print Fabric for zipper tab: 1 - 1" x 1 1/2"
~Fusible Batting ~2 Main Panel
~Muslin or Canvas ~2 Main Panel
~Lining ~2 Main Panel
Sewing Instructions:
1. Stitch the 6 1/2" x 2 3/8" shell fabric rectangles to the left and right side of the quilt block. Press.Stitch the 1 1/4" x 2 1/2" strip, centered, on the bottom of the block. Press.
2. Place the pattern on the panel and trim to size. Fuse the Batting to the back of the panel.Place the muslin or canvas Main Panel on the back.
Quilt through all layers as desired.
Repeat for the Back Pouch Panel.
3. Trim the zipper to 7 1/2" measuring from the top of the zipper head to the bottom of the zipper.
4. On the 1" side of the zipper tab, fold 1/4" to the wrong side. Press.
Press in half wrong sides together.
5. Place the bottom end of the zipper so that it is against the folded edge of the tab.
Pin in Place.
Stitch the folded edge with an edge stitch.
6. Fold back the zipper tape on the top edge of the zipper to the wrong side.
7. Place the zipper to the pouch right sides together with the top edges of the pouch and zipper tape matching.
Center the zipper on the pouch panel. Stitch the top edge with
a 1/4" seam allowance.
8. Place the lining right sides with the pouch panel right side matching the top raw edge.
Pin in place.
The zipper will be sandwiched in between the pouch and lining panels.
Stitch the top edge with a 1/4" stitch.
9. Press the pouch and lining panels away from the zipper. Press. Top stitch 1/8" away from the seam line.
~Repeat for the other side~
10. Separate the lining pieces from the pouch pieces. Place the pouch pieces right sides together, matching seams and raw edges.
Pin in place.
Place the lining pieces right sides together, matching seams and raw edges.
Pin in place.
The zipper teeth should face towards the lining.
****Make sure the zipper is open.
Sew the sides and bottom of the shell and lining, leaving a 4" opening on the bottom lining side.
Press the seams open.
11. Box the corners:
Place the bottom and side seams right sides together at the bottom corner
with seams pressed open.
Stitch the seam.
Repeat for the other bottom corner.
Repeat for the lining.
12. Turn right side out and press.
Machine stitch or hand stitch the opening in the lining closed.


