12.14.2020

Flea Market Fabric from Riley Blake!


I absolutely adore all fabrics designed by Lori Holt of a Bee in My Bonnet.  Her new line of fabric, "Flea Market" designed for Riley Blake Fabrics, is a modern take on vintage 50's fabric.  The line is reimagined with fresh colors and similar motifs that can be found on retro 50's fabric.

The prints are so adorable and I wanted to make a suite of items to showcase all the cute motifs.

This fun zipper pouch showcases all the prints beautifully!


This Fifteen Patch pouch highlights all the adorable Flea Market prints ~AND~ it is a free tutorial which you can find [HERE]


I also make a heart sachet with one of my favorite prints in the collection.  You can find the free pattern on my blog [HERE]  I am going to make a bunch of these to adorn my Holiday gifts!


I also made a roomy tote - my Nine Patch tote, and you can find the pattern in my Etsy shop.


I love to see what you make so be sure to tag your creations with the hashtags:

#ILoveRileyBlake

#RileyBlakeDesigns

#FleaMarketFabric

#ChariseCreates


Happy Sewing!

xo

Charise

12.10.2020

Pair of Cherries ~ a new pattern


 Good Day!

I have a new pattern - My Pair of Cherries paper piecing pattern.  I designed it way back at the beginning of the year for a book (shhhh don't tell anyone but the book comes out in Spring 2021!) It wasn't used in the book so I decided to finish it for my Etsy shop.  Well, almost a year later - here it is!

I would consider this an intermediate paper piecing pattern.  If you are new to paper piecing, I have a free Crayon pattern, which is a perfect beginner pattern.

It is a 6" block with instructions for enlarging to a 10" or 12" block.


I'm going to use this block to make my Home Sweet Home boxy zipper pouch which was designed for that very size block!

Enjoy the Day.

Happy Sewing

xo

Charise

12.08.2020

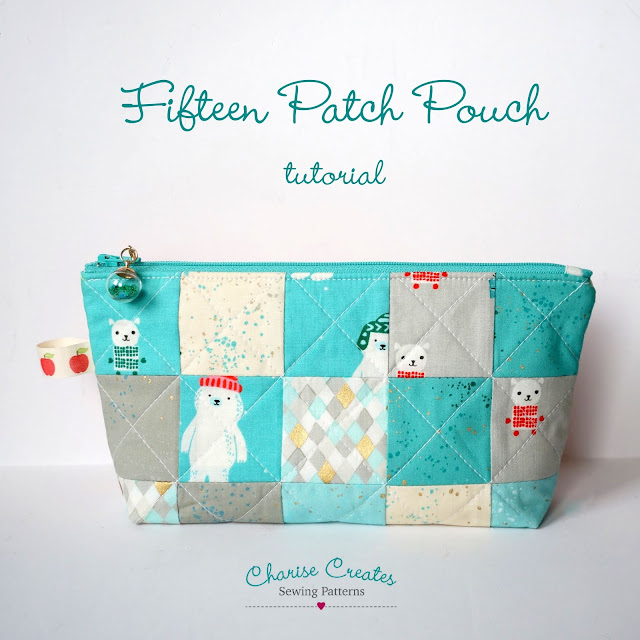
Fifteen Patch Zipper Pouch Tutorial - Mini charm pack friendly!


This Holiday season I decided to treat myself and purchased a sewing themed advent calendar from Stitch Supply Company.

It has been so much fun to open a little sewing themed gift for myself every day.  

Last week I got this adorable Flurry mini charm pack.  It didn't take me too long to figure out that a patchwork pouch would be the perfect project.

I decided to write a tutorial for you! It is a great gift item and fun to fill with goodies for a special someone. (That includes you!) 

If you don't have a charm pack, any cute little 2 1/2" squares will do : )

You can also use any panel of fabric that is 6 1/2" x 10 1/2" if you want to forego the patchwork. 


Fifteen Patch Zipper Pouch
a tutorial by Charise Creates 

Notes:
~All seam allowances are 1/4" 
Finished Size:
5" tall x 10" wide

Materials
~ 30 - 2 1/2" squares assorted print fabric (a mini charm pack works well)
    or 2 - 6 1/2" x 10 1/2" fabric rectangles if you want to skip the patchwork
~1/4 yard Lining fabric
~1/4 yard muslin or solid cotton
~1/4 yard batting 

Supplies:
~Zipper Foot
~Matching Thread
~Pins
~9" or longer coil zipper - OR- a metal zipper that measures 
     9" from the top of the zipper head to the zipper stop.
~Zipper Pull (optional)
~ 1/2" x 3" long ribbon
~Marking pen, pencil or Hera Marker for quilt marking

Cut:
~2 pieces of batting 7" x 11"
~2 pieces of muslin 7" x 11"
~2 pieces of Lining 6 1/2" x 10 1/2
~1 - 1" x 1 1/2" Print for the zipper tab


1) Arrange  the 15 print squares that make up the panel, in your desired design. 


2)  Stitch each row together.  Press seam allowances to one side, each row in the opposite direction.


3) Stitch the top row to the center row.  Press the top/center to the bottom row. 
Press seams open.
Repeat for the other side side of the pouch.


4) Fuse the batting to the wrong side of the patchwork panel.
Place the muslin on the back of the batting, baste in place.
  Quilt diagonal lines on the patchwork  panel. 
Your lines will be approximately 1 3/8” apart.
Trim the panel to 6 1/2” x 10 1/2”.  Repeat for the other side.


5) If you are using a zipper that is longer than 9", shorten the zipper to 9 1/2" measuring from the top of the zipper head to the bottom of the zipper.

6) Fold under the 1" side of the zipper tab 1/4" to the wrong side. Press.
    Press in half wrong sides together.


7) Place the bottom end of the zipper so that it is against the folded edge of the tab.
    Pin in Place.
    Stitch the folded edge with an edge stitch.


8)  Fold back the zipper tape on the top edge of the zipper to the wrong side. 
     Glue baste or machine baste in place.


9) Fold the ribbon in half, wrong sides together and place on the right side of the pouch panel
   2 1/4" from the top edge.
   Baste in place.

10) Place the zipper to the pouch right sides together with the top edges of the pouch
     and zipper tape matching.
    Center the zipper on the pouch panel.  Stitch the top edge with
    a 1/4" seam allowance, back stitching at ends.


11) Place the lining right sides with the pouch panel right side matching the top raw edge.
      Pin in place.
The zipper will be sandwiched in between the pouch and lining panels.
    Stitch the top edge with a 1/4" stitch back tacking at ends.


12) Press the pouch and lining panels away from the zipper.  Press.
     Top stitch 1/8" away for the seam line starting and stopping your stitching 3/8" 
     from the raw edge.

~Repeat for the other side~


13) Separate the lining pieces from the pouch pieces.
     Place the pouch pieces right sides together, matching seams and raw edges.  
     Pin in place.

     Place the lining pieces right sides together, matching seams and raw edges.  
     Pin in place.
     The zipper teeth should face towards the lining.
     Make sure the zipper is open.
     Sew around the perimeter  leaving a 4" opening on the bottom lining side.


14) Box the corners:
      Place the bottom and side seams right sides together at the bottom corner 
      with seams pressed open.
      Mark 1" up from the bottom corner.  Stitch on the marked line back tacking at ends.
      Trim the seam 1/4" beyond the stitching.  Repeat for the other bottom corner.

Repeat for the lining.

15)  Turn right side out and press.
        Machine stitch or hand stitch the opening in the lining closed.

Congrats!   You have made a  Fifteen Patch Zipper Pouch.

Happy Sewing.
xo
Charise


12.04.2020

Easter Egg Hunt and A Petite Tote Tutorial


Easter Egg Hunt is a new line of fabric designed by Nàtalia Juan Abelló for Riley Blake Fabrics.
I decided to make a cute little tote bag which would be a perfect Easter basket.


I used my Cozy Cottage Pattern to show off all of the cute little fabric details.  Look at those adorable bunnies as well as the Easter egg on the front door and the pretty floral motifs.
You can find the pattern in my Etsy shop [HERE]


The tote is made with my 12" Cozy cottage block and is the perfect size for a shopping trip or would be adorable for an easter egg hunt this April.
You can find the tutorial

I used Riley Blake Kisses for the background and roof of the house.
The beautiful shade of yellow for the house is Riley Blake Confetti Cottons in Color Beehive. 


For the back of the tote, I used the Floral Mint and quilted the panel in a 2" diagonal pattern.  

The lining is Riley 1/8" gingham in color Coral.


There are so many adorable prints in this collection!

The possibilities are endless!

Please tag your projects on social media with the hashtags:


#EasterEggHuntFabric

#RileyBlakeDesigns

#ILoveRileyBlake


Happy Sewing

xo

Charise