1.28.2015

Anna Blouse in Kokka Camera Fabric


 Happy Wednesday!

I have some fun sewing to share today.
I have been working away on the instructions for my Anna blouse and making another short sleeve sample to help me write the instructions.  This project has been going on for - dare I say - a year, yikes!  It has been quite the learning curve with the hardest part grading the pattern on my IMac using Adobe Illustrator (turning the size 10 into size 2-18)!  My experience is drawing in Illustrator so it took some time to learn how to grade the pattern.
I am so excited to finish because I have ideas for so many more garment patterns I want to make.


I was going to use photo instructions for sewing the blouse together, but after asking my IG friends their preference between photos and illustrations, the overwhelming vote was illustrations.   
It takes more time but I think the results are worth it : )


I purchased this adorable Kokka Camera Fabric a few months ago and am so excited to put it to use.
It is a gorgeous shade of blue - a beautiful turquoise blue.
You can find it on sale here!    So sorry, it is sold out.  If I find a source I will update this post.
The scale is fairly small - cameras are about 1"  - 1 1/2", so it is a perfect fabric for quilty projects too.

I have been working on my "Scrappy nine Patch" and have decided to add a rather interesting border so this will not be done any time soon.  I think it will be worth it though - spending a little extra time to get the exact look I want!


1.26.2015

Tips for Sewing with Suede and Leather


I love to use suede as trim on the purses I sew. 
I think it adds a professional look to my projects.


 I was so excited with the results of my suede trimmed “Lovely Gathered Clutch” that I decided to stitch a clutch purse entirely in suede. 

 Here are my tips based on sewing on my home machine. I hope these tips encourage you to take the plunge in sewing with suede and leather! 


 Each one of these clutch purses were sewn on my very simple Singer Home sewing machine!


1. A walking foot is my answer to all sewing on suede except for zippers (see #7 below).  I’ve tried a teflon foot but the walking foot has yielded the best results for me.

2. Use polyester or nylon thread.  If you want your topstitching to stand out, use a heavy weight 100% Polyester heavy weight thread.
3. Attach a leather needle to your sewing machine.  A leather needle is extra sharp and designed for suede/leather sewing.  I like to use a size 18 needle for mid weight suede / leather. 
4. Use a longer stitch length and loosen tension. I set my machine to 3.5.  Be sure to test your stitch length and tension on a scrap piece of suede before you sew your final project.

5. Use non-fusible interfacing to add stability to suede and leather.  To attach the interfacing to the suede/leather piece, apply glue ~ I like to use a fabric glue stick ~ to the perimeter of the sudede/ leather piece and attach the interfacing.  Baste around the outer edge of the piece with a basting stitch 1/4" from the edge.


6. Use clips to hold the seams together.  My favorite clips are from Clover.  Pinning is not an option as it will leave holes in the suede/leather.


7.  For sewing on a zipper, or any time you can't use a walking foot, cut a strip of tissue paper about 1” wide and a few inches longer than the seam you are sewing.  Place the tissue under the seam and the suede will not get stuck to the feed dogs and sewing machine plate when stitching the seam.


Remove the tissue paper when you are finished sewing the seam.


8. To flatten seams, use a brayer.  To keep the seam in place before stitching, apply fabric glue stick to the seam allowance to hold in place as pictured. If you want to hold the seams in place permanently, use permanent contact cement.

I hope those tips will help you feel confident sewing with Suede or Leather!!

xo
Charise

1.21.2015

Lovely Gathered Clutch in Suede ~ Work in Progress Wednesday


Happy Wednesday!  
I recently make my Lovely Gathered Clutch with Suede Trim and just love it.
The fabric on the left is from Cotton + Steel - Tokyo Train ride.  
The suede I have had in my stash for ages.  It is leftover  from my Fashion Design Days when I was designing suede jackets : )


I thought it would be fun to make a clutch entirely in Suede! 
I changed the gathers to pleats and I will share the "how to" in another post : )

Through trial and error, I have come up with some tips and tricks that make it possible to have professional results sewing Suede and Leather on your home machine.

Look for a post where I share my tips for sewing on Suede and Leather.


I also could not resist starting another clutch in my new favorite print from Melody Miller's "Playful Line" for Cotton + Steel Fabrics.  It is a wonderful collage print and I'm looking forward to making more purses with it!
The pink border fabric is also from Cotton + Steel.

This is such a fun pattern and easy to sew up!

It is so nice to sew with "Springy" fabrics in the middle of Winter!  I hope to finish it before I have to pick up the kids this afternoon : )  
(It did not happen - maybe tonight!)

Be sure to head on over to Freshly Pieced to see the other wonderful "WIP Wednesday" projects!

xo
Charise


1.16.2015

Tea Time Pattern available in my Etsy and Craftsy shops


I just listed my new "Tea Time" pattern in my Etsy and Craftsy shops!


Looking forward to combining it with my other kitchen themed blocks -
I think I may be close to having enough blocks for a kitchen themed quilt : )

xo
Charise

1.14.2015

Tea Time ~ Work in Progress Wednesday


Happy Wednesday to you!  Today I have been working on a quilt block for the Cocorico Online Quilting Bee on Flickr.  Kylie asked for tea themed blocks for her quilt. 

Kylie supplied some great images and I used one of them for the inspiration for this design.


I am happy with it overall but I think that next time I will make the spoon in a darker fabric so it "pops" a bit more.

I will be sure to share here on my blog when the pattern is in my shops for sale : )


I love the tea bag - that adorable tea pot motif is from a Japanese fabric I have had in my stash for ages and I love to use the motifs for paper pieced blocks.

Be sure to head on over to Freshly Pieced for more wonderful Works in Progress or search the hashtag #WIPWednesday on Instagram. : )

xo
Charise

1.11.2015

Pencil Pouch Tutorial


Hi!  So glad you stopped by. Today I am sharing a tutorial for a pencil pouch that uses my Paper Pieced Crayon Block.  
You can find the paper pieced crayon Pattern and Tutorial HERE.

This is a perfect gift and extra special filled with a set of colored pencils or crayons!
I made one for each of my kid's teachers for Christmas gifts.  Enjoy!


Supplies
~ Matching Thread
~ Contrast Thread
~ Sewing Machine zipper foot
~ 1 Paper Pieced Crayon Block - The tutorial and pattern link is HERE
~ F8 (9" x 22")  Linen fabric - I used Robert Kauffman Essex Yarn Dye Linen in color Flax
~ F8 (9" x 22")  Print Fabric
~ 1/4 yard Fusible Fleece
~ 1/4 yard light weight interfacing - I used Pellon SF101
~ 9" (or longer) coil Zipper to match Crayon
~ 2 1/2" length of decorative twill tape or ribbon (optional)

Cut
~ From the Linen:
2 - 2 3/4" x 10", 2 - 1 3/8" x 2 3/4", 10" x 5 3/4"

~Print Fabric
2 - 10" x 5 3/4" lining , 2 - 3" x 1 1/4" Zipper Tabs

~Fusible Fleece
2 - 10" x 5 3/4"

~Light Weight Interfacing
2 - 10" x 5 3/4"

Finished size:
9 1/4" x 5"


Step 1 ~ Prepare the outside and Lining panels

1. Stitch the 1 3/8" x 2 3/4" rectangles to each end of the crayon.
Stitch the 2 3/4" x 10" rectangles to the top and bottom of the crayon.  Trim to 10" x 5 3/4".


2. Fuse the Fleece to the back of the crayon block.  Stitch in the ditch around the perimeter of the crayon.

3. Fuse the 10" x 5 3/4" fleece to the back of the 10" x 5 3/4" linen piece.
Fuse the 10" x 5 3/4" light weight interfacing to the back of the 10" x 5 3/4" lining pieces.

Step 2 ~ Attach the Zipper

4.  Measure the zipper and trim to 10” including the zipper tape.


5. Fold the under the ends ¼” of the 3” x 1 ¼” pieces on the 1 ¼” side towards the wrong side.  Press.  Press in half.


6. Butt the end of the zipper to the fold on the tab.  Pin in place.  
Stich the folded edge with an edgestitch.
Repeat for the other side.

Cut the folded edge and trim the zipper to ¼” beyond the edge stitching. Repeat for the other  side.  


7.  Place zipper face down on the right side of the Pouch Panel.  Place the long edge of the zipper tape matching the top edge of the Pouch Panel and Pin in place. 


8.  Attach the zipper foot to your sewing machine.   Stitch 1/4” away from the raw edge, starting and stopping 3/8” from edge, back tacking at ends. 

9.  Place the lining right sides with the right side of the clutch panel.  The zipper will be sandwiched in between the Pouch Panel and the Lining.  Pin lining in place along top edge.
With the outside panel, wrong side, facing you, stitch, follow the stitching that attaches the zipper to the outside panel.


10. Turn the lining over the zipper. The wrong side of the Pouch Panel will be facing the wrong side of the Lining. Press both panels away from the zipper.  Top stitch along the top edge, ¼” away from the top edge stopping and starting 3/8” from side edge, back tacking at ends.
  
11. Repeat  steps #8-10 for the other side.

12. Fold the twill tape right sides together and position 1/4" below seam at top on the left front side.  Baste in place. (see picture above)

Step 3 ~ Finish the Pouch


13.  Separate the lining from the Clutch Panels.  Place the Clutch Panels right sides together matching the top seams and raw edges.  
Mark the bottom corners with a gentle curve.  You can use a mug or cup to trace the curve.
Fold the lining out of the way toward the center of the panel and pin.  
MAKE SURE THE ZIPPER IS OPEN so you can turn right side out at the end.
Stitch 3/8” from edge starting at the top folded edge of the zipper end. Clip small triangles on curved corners being careful not to clip into the stitching.
Press seam open. 


14.  Unpin the lining panels at each end of the zipper. Place the lining right sides together, matching raw edges.   
Mark the bottom corners with a gentle curve.
Pin around perimeter.  Starting just below the zipper coils, stitch 3/8” from edge,
leaving a 4” opening at the bottom for turning. Clip small triangles on curved corners being careful not to clip into the stitching.
 Press seam open.  

15. Turn right side out and press.  Slip stitch or machine edge stitch the opening in the lining closed.
You have completed your Pencil Pouch.  Enjoy!

xo
Charise

1.08.2015

Paper Piece a Crayon ~ A Beginning Foundation Paper Piecing Tutorial and Pattern!


Hello!  So glad you stopped by today!  I am sharing a tutorial for beginning foundation paper piecing using my new, FREE,  Crayon pattern as the example. The crayon was featured in an article I wrote for the current issue of "Sew It All" as an example of a simple, one unit, foundation pieced block.    If you are new to paper piecing, this is the perfect beginner pattern!

The pattern is available HERE.

And be sure to check out "Sew It All" magazine for my Sewing Machine Cover : )

The fabrics I used for this are Robert Kaufmann Essex Yarn Dye linen in color flax for the background, solids and prints in my stash (favorite scraps work well for the small prints) and the text is an older Kumiko Fujita print.
  You can find great Japanese prints on Etsy - Sew Me a Song has a nice collection including a great selection of text prints including new Kumiko Fujita text prints.


You can find the tutorial for the Pencil Pouch [HERE]

***A few tips before you start***

~Foundation Paper Piecing uses a paper foundation for the block design. The stitching is done directly       on the paper foundation pattern.

~The pattern is a reverse image of the finished block.

~ Paper piecing can be a bit confusing since the right side of the fabric is placed on the wrong side of the pattern.  The stitching is done on the printed or right side of the pattern.  

~Many foundation paper piecing patterns do not include seam allowance.  Be sure to add a 1/4” seam allowance around the block or block sections if the pattern has more than one.

~Be sure and press each seam after you apply a new piece of fabric to your block.  Use a dry iron so you do not distort the paper foundation pattern.


~Foundation Paper Piecing Supplies:
Most of the supplies you most likely already have in you tool box!
  1. Thread - All purpose thread or 100% cotton thread will work well.  Choose a neutral color.  I like to use cream or natural color thread. My favorite thread for paper piecing is Aurifil 50 wt thread.
  2. Needle - always start with a new sewing machine needle size 90/14.  You will be sewing through fabric and paper which will dull your needle.
  3. Fine Pins - Pins are an important part of foundation piecing to keep fabric pieces in place when sewing.  I like to use fine pins with a flat head.  My favorite pins are .45mm ones from Clover.
  4. Paper or Vellum - You will transfer the pattern to paper to use as the foundation.  There are lots of specialty papers for foundation paper piecing but copy paper also works well.  Try out a few different kinds of paper to see what works best for you.  I prefer a translucent vellum so you can see the fabric through the paper.  Perfect for fussy cutting!
  5. Acrylic ruler. - You will need an acrylic ruler to trim your seam allowances to 1/4”.  You can use a standard 12” acrylic ruler.   “Add a 1/4” rulers are also a great option as they have a 1/4” lip ensuring accuracy when trimming seam allowance
  6. Fabric glue stick - A great tool if you need to secure a tiny piece of fabric that is too small for a pin.
  7. Rotary cutter and self healing cutting mat for trimming all the seams to a precise 1/4".


Let's Make a Paper Pieced Crayon!


Step 1
Print out the pattern.  Use the printed copy  or trace the pattern on to your foundation paper.  When you print out the pattern, be sure to set your printer to “page scaling none” or "actual size" and check that the 1” test square measures correctly.


Step 2
Set your sewing machine stitch length to 16-18 stitches per inch.  This will make it easy to remove the paper backing after you finish sewing the block together.

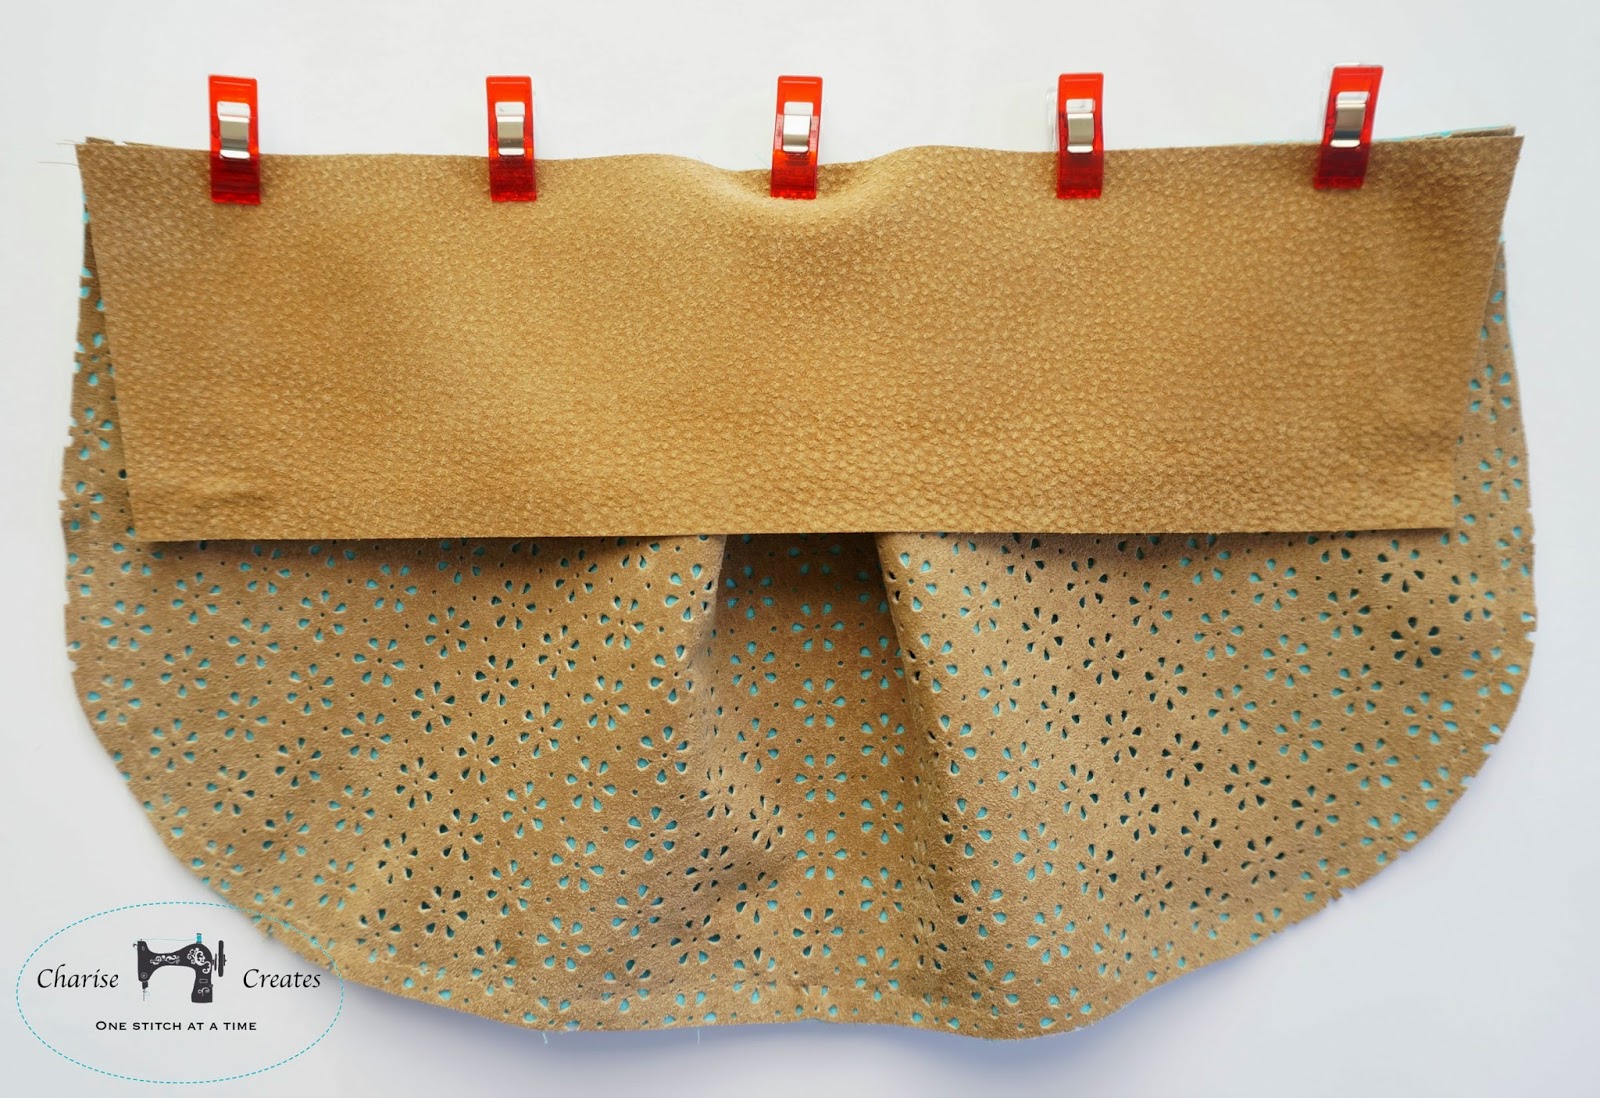
Flip the pattern over so the wrong or unprinted side is facing you.  Place a piece of fabric, right side up, over section 1 making sure there is at least 1/2” fabric around the perimeter of the section.  This will give you a little extra fabric when you are sewing.  The right side of the fabric will be facing you.  The wrong side of the pattern will be facing you.  Hold the foundation pattern up to a light source to help position the fabric.  Pin or glue in place. 

Step 3


Flip the pattern over so the printed side of the pattern is facing you.  Fold the pattern back on the line between sections 1 and 2.  Trim the seam to 1/4” using a rotary cutter and acrylic ruler.  This is your seam allowance. 

Step 4


Place the adjacent fabric piece 2, right sides together with 1.  Pin in place along the seam line.
  

Fold the fabric over to make sure is entirely covers 2. 
Flip the fabric back over remove the the pin along the seam line and pin in place for sewing.

Step 5


Flip the pattern over and stitch on the line between 1 and 2 back tacking at the end of the stitching line.  If the seam line extends to the pattern edge, stitch 1/4” beyond the edge. 

Step 6


Flip the pattern over to the wrong side and fold back the second piece of fabric.  Press in place. 

 Step 7
Add the remaining pieces of fabric in numerical order following steps #3-6.

Step 8

Once all the pieces are added your block will look something like this.

Step 9


Trim the block 1/4” beyond the pattern edge. 

Step 9
Remove the foundation backing paper.  Give the block a good press.

Congratulations - you have made a paper pieced block!!!
Be sure to check out the Pencil Pouch Tutorial [HERE]

Happy Sewing!

xo
Charise


1.07.2015

Work in Progress Wednesday ~ Scrappy Nine Patch Quilt

Happy Wednesday to you : )


Over the Holiday I was inspired to start a new quilt - My Scrappy Nine Patch.  


I had scraps left over from some log cabin blocks I was working on for the Scrappy Log Cabin Quilt along on Instagram and thought this would be the perfect use for them!


It was fun to go through my smallest scraps and pull anything that was bigger than 2" square.


Not all pieces came from the scrap bin....some of my favorite blocks are fussy cut squares from favorite fabrics.

Be sure to see all the lovely works in progress over at Freshly Pieced

xo
Charise

1.05.2015

Learn to Paper Piece with me in Issue #9 of Sew It All!

Fabrics used: Robert Kaufmann Essex yard dyed linen in Flax, Blue Polka Dot Spot On by Robert Kaufmann, Blue Floral print from Moda Boho by Urban Chiks, Pink Text print from Riley Blake "Vintage Happy" by Lori Holt. 

Hello and Happy Monday!  I am so happy to be in the new issue of Sew it All.
I have written a paper piecing article for the magazine and it covers all the basics you need to master the technique of foundation paper piecing.  I share the supplies you need, and my tips and tricks for creating a successful paper pieced block.


You can download the paper pieced sewing machine pattern for free for a limited time HERE.
You can find the digital version of the magazine HERE which has the information to make the sewing machine cover.

There is also a fun project to make - a paper pieced sewing machine cover.


The sewing machine cover is a simple project as well.


It is finished with bias tape and has pockets on the back to store your current sewing project, patterns or notions!


Be sure to check back on Friday, January 9th, when I share a
new pattern and beginning foundation paper piecing tutorial!
If you can't wait, I've listed the pattern which includes the complete paper piecing tutorial on Craftsy HERE  : )

xo
Charise