I finally finished the pattern for these little apples. Link to the Pattern Here!
If you have any questions/ comments, please leave a comment on this post and I will answer here so everyone can see the response. Tks!!
Paper pieced apple tutorial:
1) First, I like to print out a copy of the pattern for reference.
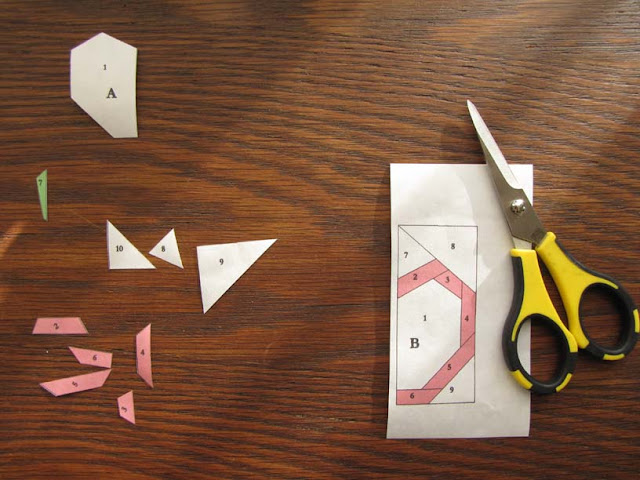
Photo copy the Fabric Cutting Template onto freezer paper, dull side.
Carefully cut out your pattern pieces on the black lines.
I like to sort the pieces in groups by fabric.
2) Iron the pieces to your fabric, right side.
Leave at least a 1/4" s.a. around each piece.
3) Print out your Foundation Paper Piecing Templates onto copy paper
or Vellum. I have also used heavy wt. tracing paper.
Pls note *** these templates are the mirror image of the actual block.
Position piece #1 over the template. If you are using copy paper, you will have to
hold the fabric up to a light or window to see through the paper to postion the piece correctly.
Pin your fabric in place
.
4) Place piece #2 onto piece one matcing your seam line.
Lift piece #2 to and use your freezer paper edge to help match up the seams and pin into place.
5) Flip your template over and stitch on the seam line between piece #1 & #2.
I use a small stitch and back tack at the end of each seam line.
6) This is how your pieces will look after sewing.
7) Fold your template back and trim your seam allowance to 3/16".
8) Continue around piece #1 until you have your apple sewn together.
9) ****Note that A7 and A8 are stitched together before stitching to A3****
10) When you are finished sewing, you will have two apple halves. Match and pin at seams. Stitch down the center for your completed apple.
I added a border and some seeds with a lazy daisy stitch!
Pls comment with any questions and I'll be sure to answer you : )


wow! the two times i paper pieced i just stuck big chunks of fabric on there and cut it down after each stitch line. this makes much more sense... :D
ReplyDeleteLovely tute Charise! Those little seeds are perfect!
ReplyDeleteWhat a wonderful apple pattern! So cute with its little seeds!
ReplyDeleteCharise, wonderful tutorial! I would love to try this lovely apple immediately:)
ReplyDeleteDid you change setting in Google docs? I can't open a pattern:(
This is such a great tute, Charise! the teeny tiny apple on the stem is killing me!!
ReplyDeleteJulianna -
ReplyDeleteI just changed the settings, OOPS !
Tks for letting me know!!
i love this sweet apple block.
ReplyDeleteThank you for this tute. Found you on fwqal yahoo. I am new to pp piecing and have been reading everything I can find. I cannot wait to try your methods. You have meshed the best of both worlds, pp piecing and freezer paper. This makes sense to me!
ReplyDeleteThank you so much for this tutorial. I found you on The Fabric Shopper's blog and saw the teapot and bought the chart and now I have this too. I am new to everything and have been for a couple of years because oh well just because. But I know I like paper piecing the best and this apple shall be my next project.
ReplyDeleteThis is great information. I've been wanting to try the freezer paper technique for a while...it's time!
ReplyDeleteOops! I totally forgot to drop by and say thank you for your wonderful pattern. I love the little needlebook and pin cushion that I made with this pattern... Thanks
ReplyDelete*IF* i can get my act together enough in the next couple of weeks, i'll be making this into mug rugs for my daughter's teachers. :)
ReplyDeleteOkay, Charise -- I finally tried paper piecing! I followed directions from a book, and did a quarter section of a 12" star block. It was so nerve-wracking, not being able to see my fabric under the paper while I was sewing! I was wondering how you managed to achieve such precise pattern placement on your designs with this method, and now that I've found this tutorial I see you are doing it a little differently than my book instructs. Instead of cutting oversized rectangles for each piece, you are cutting the exact shape with seam allowance. Does your freezer paper also help hold the little pieces in position so they cannot slip when you put them under your needle? I wish I could watch you do this in person! And I am wondering whether you are able to buy 8 1/2" x 11" sheets of freezer paper somewhere, or if not, how do you get freezer paper to feed nicely through your printer or copy machine? My husband would be so upset if I melted wax from the freezer paper in the printer he used for work...
ReplyDeleteThanks so much for doing this tutorial. I love apples too! Can you tell me how big the pattern should measure. I am printing it out on my ipad and it seems too small.
ReplyDeleteThese would make darling potholders for teacher gifts. Thanks for the pattern and instructions!
ReplyDeleteHi! This is exactly what I'm looking for my Disney Princess inspired quilt. :) Are you able to please tell me the dimensions of the block when it is finished? Thanks!
ReplyDeleteobrigada pelo tutorial. vou tentar fazer.
ReplyDeletebandar s128 sabung ayam aman dan terpercaya
ReplyDeleteBosan Menang tidak dibayar ? judi sabung ayam
ReplyDeleteSabuk Ayam
ReplyDelete