11.28.2022

Happy Patchwork Pouch ~ a Free Pattern


Hello!

I have lots of projects underway but had an idea for a new design based on my 15 patch pouch pattern.

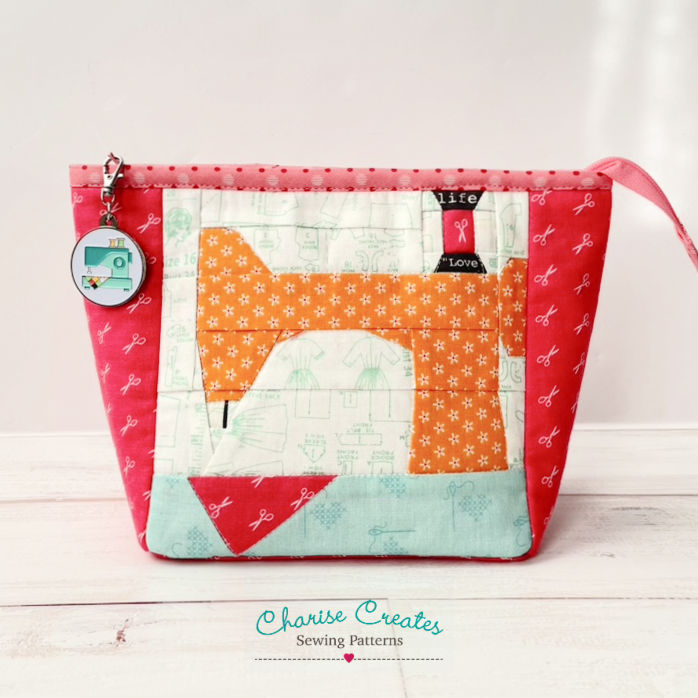
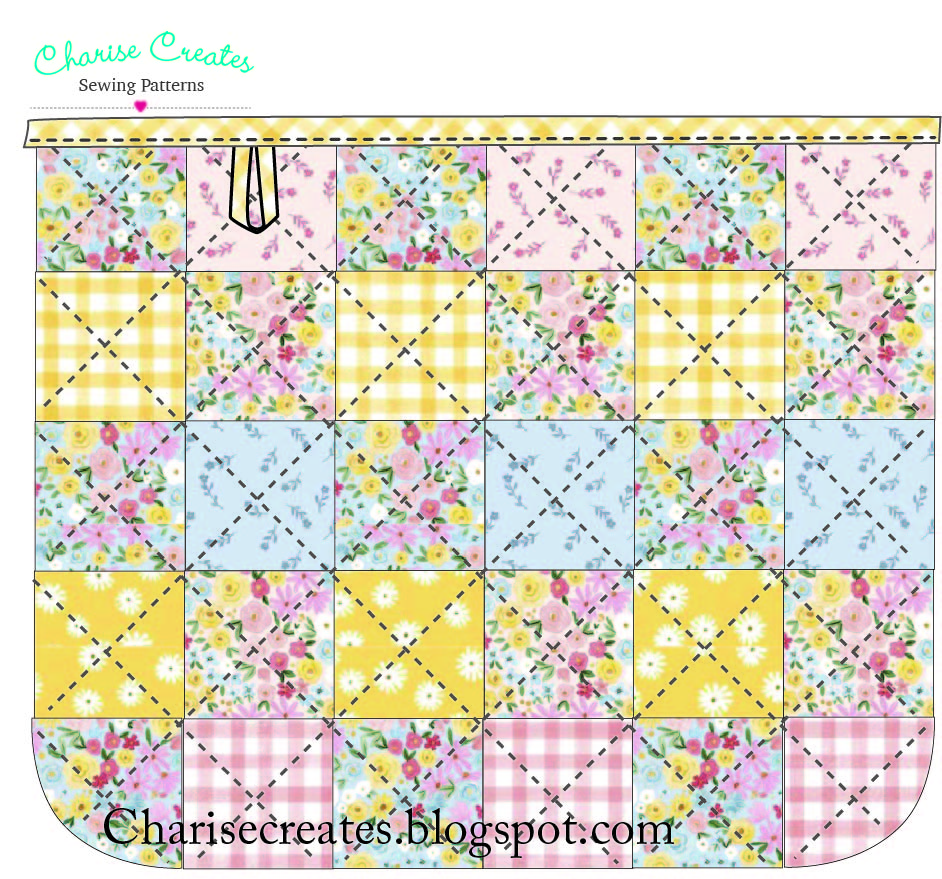
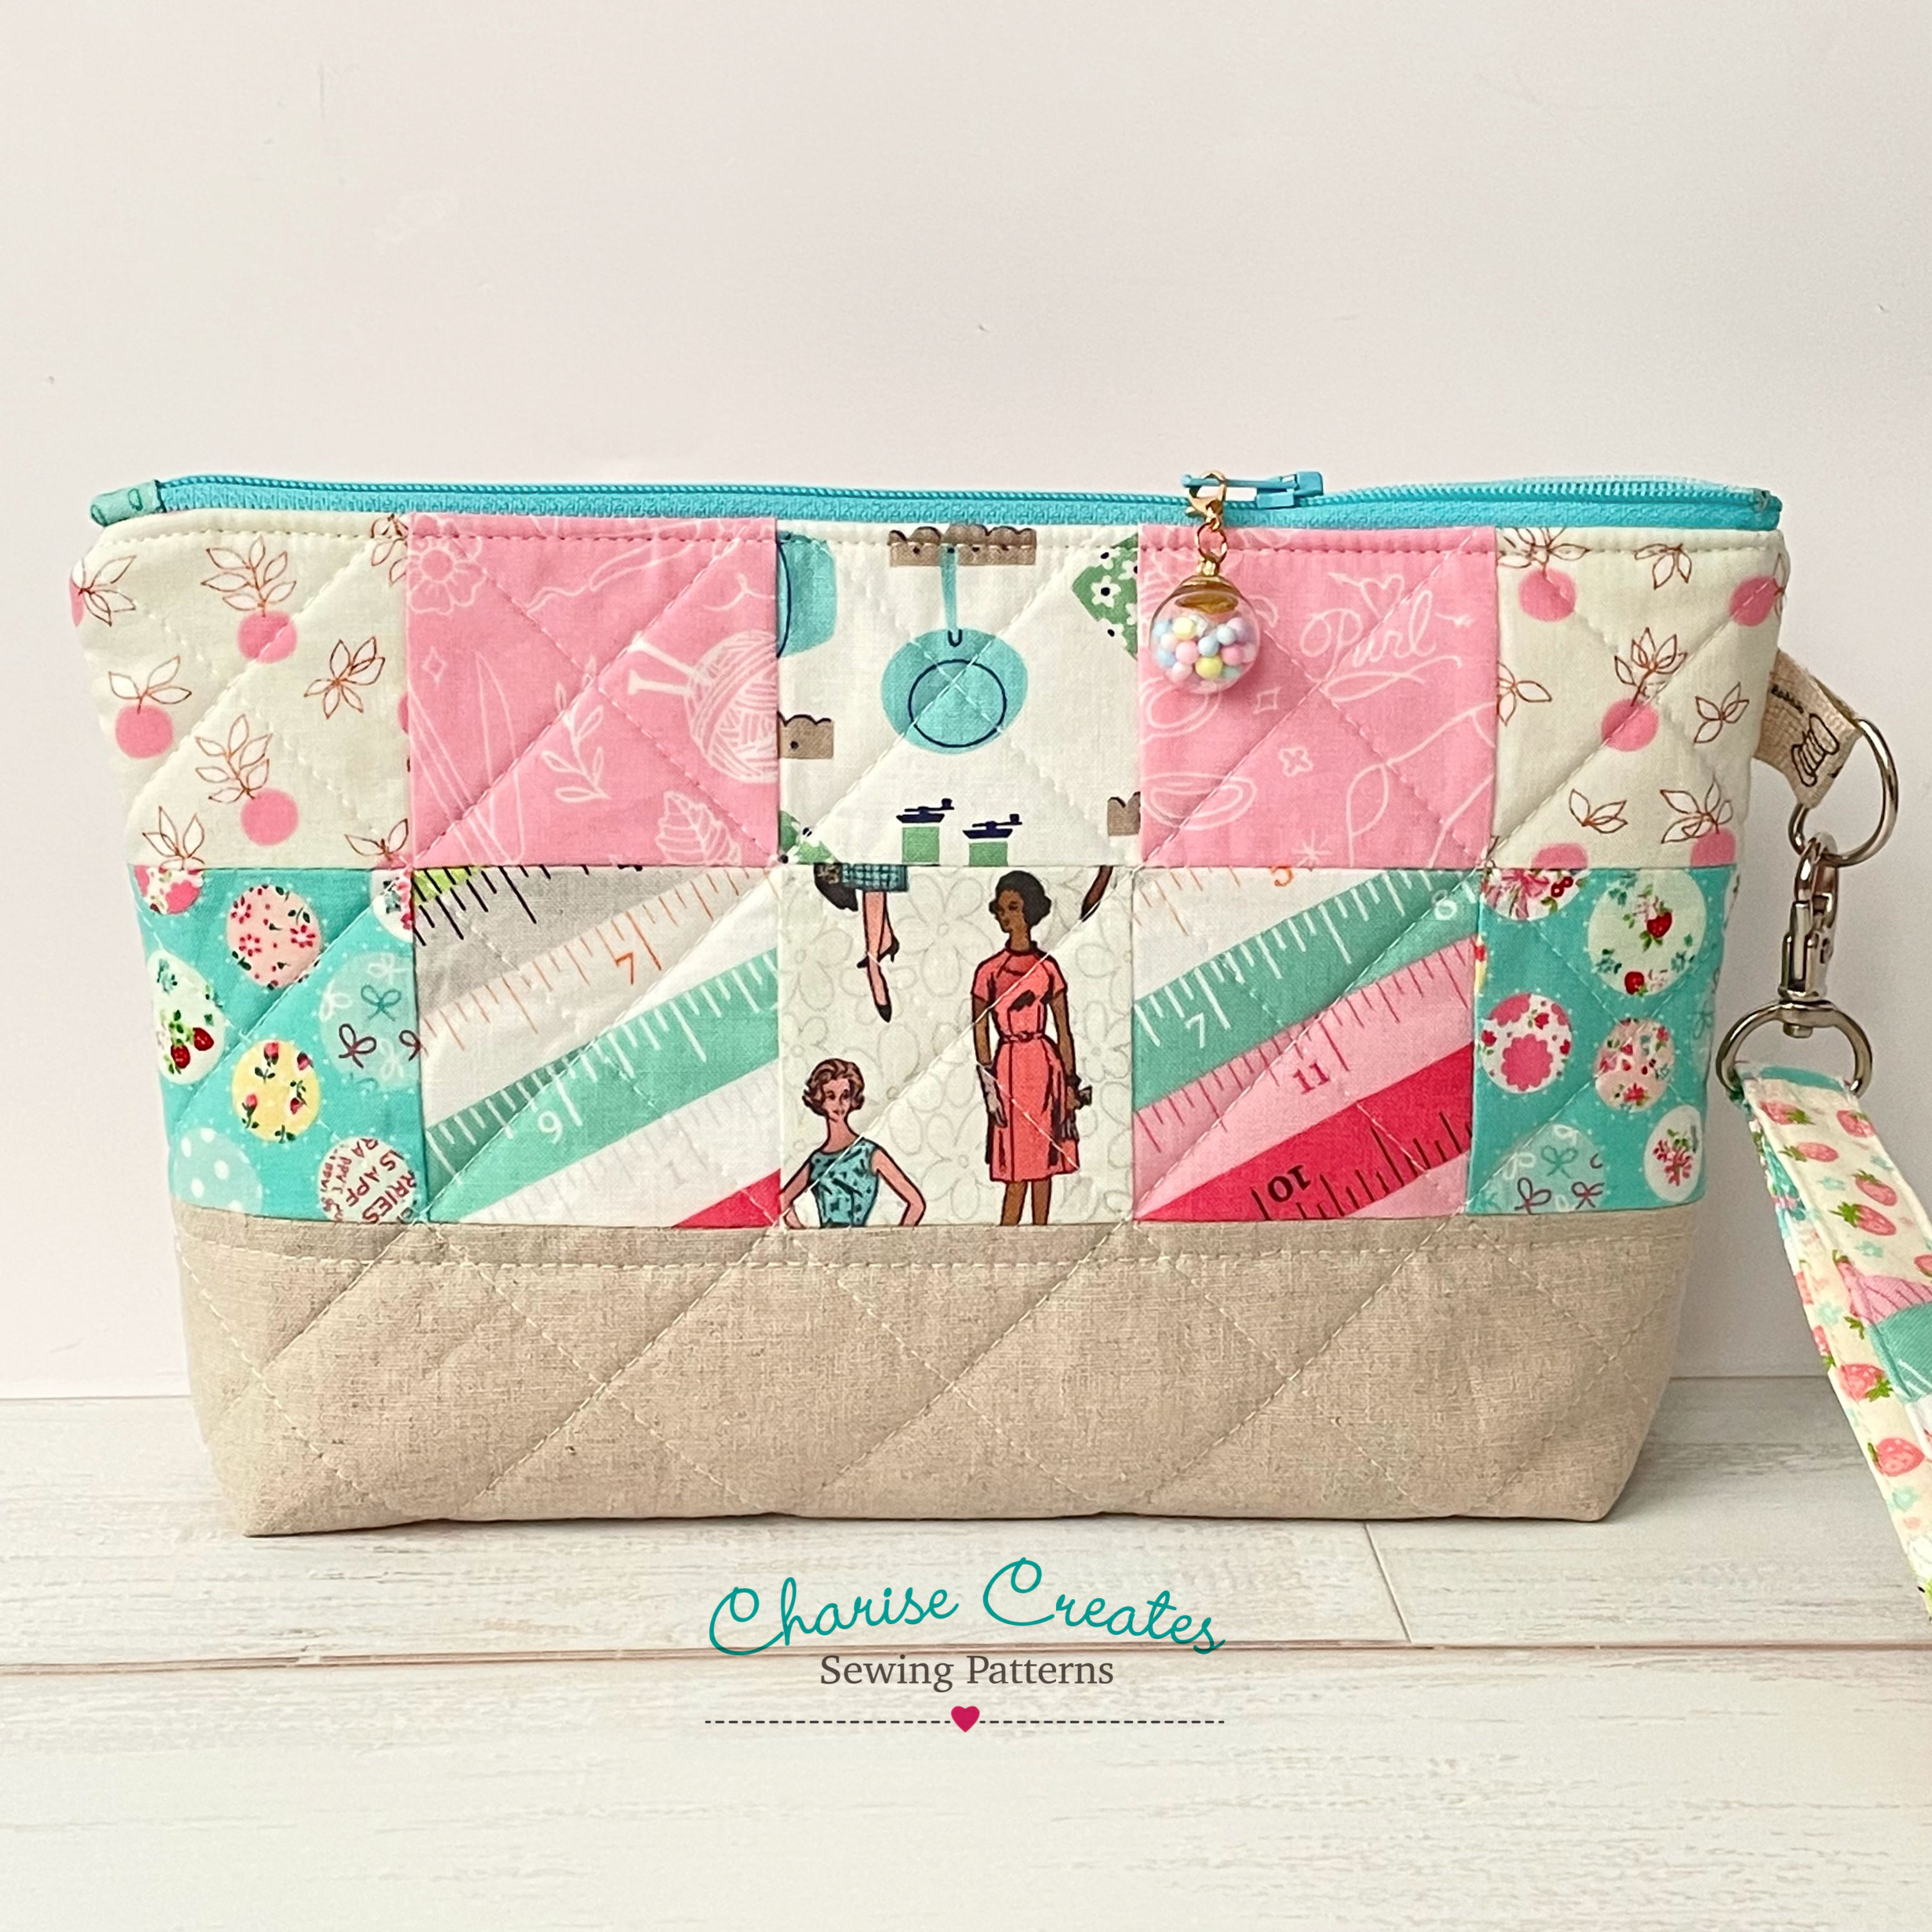
My Happy Patchwork pouch has 10 square patchwork with a solid bottom panel.  I thought it would also be nice to add a handle so the pouch could be used as a clutch purse.

The fun little zipper charm is from Sunny Day Supply - a gift with purchase : )


You can find the pattern details as follows.

Enjoy !


Happy Patchwork Pouch

Notes: ~All seam allowances are 1/4" 

Finished Size:  6" tall x 10" wide

Materials:
~ 20 - 2 1/2" squares assorted print fabric (a mini charm pack works well)
~6 - 2" x 2 1/2" rectangles for patchwork handle (optional)
~1/8 yard Linen for bottom of pouch
~1/4 yard Lining fabric
~1/4 yard muslin 
~1/4 yard Fusible batting 
~1/4 yard light weight fusible interfacing

Supplies:
~Zipper Foot
~Matching Thread
~Pins
~9" or longer coil zipper - OR- a metal zipper that measures 
     9" from the top of the zipper head to the bottom of the zipper stop.
~ 1/2" D Ring
~3/4" Swivel Clasp
~Zipper Pull (optional)
~ 1/2" x 2" long ribbon
~Marking pen, pencil or Hera Marker for quilt marking

Cut:
Fusible Batting     ~2  - 7 1/2" x 10 1/2" 
Fusible Light Weight Interfacing ~ 2 - 7 1/2" x 10 1/2" 
                                                1 - 2 1/2" x 12 1/2"
Muslin                    ~2  - 7 1/2" x 10 1/2" 
Lining                     ~2  - 7 1/2" x 10 1/2" 
Print Fabric            ~1 - 1" x 1 1/2" Print for the zipper tab
Linen
    ~2 - 3 1/2" x 10 1/2"  Pouch Bottom
    ~ 1 - 2" x 12 1/2" Handle

Apply Interfacing -  Fuse the Light Weight interfacing to the Lining Panels and Linen Handle.


~ Sewing Instructions ~
1) Arrange the 10 print squares that make up the panel, in your desired design. 

2)  Press seam allowances to one side, each row in the opposite direction.  


3)  Stitch the rows together.  Stitch the linen rectangle to the bottom of the two rows.
Press seams open.
Repeat for the other side side of the pouch.

4) Fuse the batting to the wrong side of the patchwork panel.

Place the muslin on the back of the batting, baste in place.
Quilt diagonal lines on the patchwork  panel.
Trim the panel to 7 1/2” x 10 1/2”.  Repeat for the other side.


5) Shorten the zipper to 9 1/2" measuring from the top of the zipper head to the bottom of the zipper.


6) Fold under the 1" side of the zipper tab 1/4" to the wrong side. Press.
    Press in half wrong sides together.


7) Place the bottom end of the zipper so that it is against the folded edge of the tab.
    Pin in Place.
    Stitch the folded edge with an edge stitch.


8)  Fold back the zipper tape on the top edge of the zipper to the wrong side. 
     Glue baste or machine baste in place.


9) Fold the ribbon in half, wrong sides together and thread the D ring through the ribbon.
Place on the right side of the pouch panel 1" from the top edge.
   Baste in place.


10) Place the zipper to the pouch right sides together with the top edges of the pouch
     and zipper tape matching.
    Center the zipper on the pouch panel.  Stitch the top edge with
    a 1/4" seam allowance, back stitching at ends.


11) Place the lining right sides with the pouch panel right side matching the top raw edge.
      Pin in place.
The zipper will be sandwiched in between the pouch and lining panels.
    Stitch the top edge with a 1/4" stitch back tacking at ends.


12) Press the pouch and lining panels away from the zipper.  Press.
     Top stitch 1/8" away for the seam line starting and stopping your stitching 3/8" 
     from the raw edge.

~Repeat for the other side~


13) Separate the lining pieces from the pouch pieces.
     Place the pouch pieces right sides together, matching seams and raw edges.  
     Pin in place.

     Place the lining pieces right sides together, matching seams and raw edges.  
     Pin in place.
     The zipper teeth should face towards the lining.
     Make sure the zipper is open.
     Sew around the perimeter  leaving a 4" opening on the bottom lining side.

14) Box the corners:
      Place the bottom and side seams right sides together at the bottom corner 
      with seams pressed open.
      Mark 1" up from the bottom corner.  Stitch on the marked line back tacking at ends.
      Trim the seam 1/4" beyond the stitching.  Repeat for the other bottom corner.
Repeat for the lining.

15)  Turn right side out and press.
        Machine stitch or hand stitch the opening in the lining closed.

Make the Clutch Handle


16) Fold the handle rectangle in half along the 12 1/2" edge, press.
Fold under 1/4" on each edge. Press.

17) Thread the handle trough the swivel clasp.  With the right sides together match the raw edges on the 2" side.  Stitch together with a 1/4" seam.  Press the seam open.


18)   Fold the handle in half, folding under the 1/4" on each edge and pin in place.
Edge stitch along the edge of each long side of the strap.
Fold the handle in half with the seam on top.  Stitch 3/4" from the top edge.

~OR~
Make a Patchwork Clutch Handle

1) Cut 6 - 2 " x 2 1/2" rectangles.  Stitch the rectangles together on the 2" side.  Press seams open.

2) Fuse the 2" x 12 1/2" interfacing to the back of the patchwork strip.  
Follow steps #16 - 18 to finish!

11.26.2022

Make it Modern with Bee Basics and Backgrounds


Hi! 

 I had the opportunity to play with the fabric line from  Lori Holts ~ Bee Basics and Backgrounds. I absolutely love Lori Holt's designs and was inspired to make some fun paper pieced blocks.

The background I chose for the blocks is called Bee Backgrounds Pattern in color Mint. It is the perfect background for these sewing themed blocks. Can you find the vintage 60's gal with the bee hive hair do? She is so darn cute!

I used five different prints sewn together for the body of the Thread Spool. I love how it turned out!
I also used the Bee Happy text print to add some fun fussy cut words to the thread spool. 


I used the same Bee Happy text print for the fussy cut text and the adorable Heart print for the body of the Vintage Iron. 


The blocks were begging to be made into some fun boxy pouches.

The happy ginghams were perfect for binding the top of the pouches!

You can find the Vintage Sewing Paper Piecing Patterns and the Home Sweet Home zipper pouch in my Etsy shop - Charise Creates.

Happy Sewing!

Charise

10.01.2022

"Sew Much Fun" - Diamond Patchwork Purse and matching Macaroon Pouch


Hi!  

I had the pleasure of working with the absolutely adorable new fabric collection "Sew Much Fun" from Riley Blake Designs.


This sewing themed collection includes a sewing machine print, thread spool prints and lovely florals in shades of pink, coral, and light blue.

The selvages are adorable and I used one to trim the top of the pocket on my Diamond Patchwork Purse.


You can find the Diamond Patchwork Purse in my Etsy shop - Charise Creates.

The background fabric for the diamond spool pocket is Riley Blake Linen in color Natural.  The shoulder strap was make with Riley Blake Linen in color Navy.


Of course I had to make a matching zipper pouch!  This is the larger Macaroon Pouch. You can find the pattern in my Etsy shop.  


The cute zipper pull is from Sunny Day Supply - free gift with purchase : )


If you make a project with Sew Much Fun fabric, be sure to use the following hashtags.  I love to see what you make!

#SewMuchFunFabric #ILoveRileyBlake #RileyBlakeDesigns

Happy Sewing!

Charise

9.29.2022

She Who Sews - Tote Bag and Petal Pouch


 I love sewing themed fabrics and "She Who Sews" is no exception. The new fabric designed by J. Wecker Frisch includes vintage sewing machine and notions inspired designs, and is printed on a lovely light weight cotton twill. 


"She Who Sews" is a perfect fabric for home decoration projects and bags. I decided to make a very large and useful tote bag. The large scale button print is the perfect choice for the outside bag and I used the vintage sewing Machine print for the outside pocket. It is always nice to have a large tote for extra large sewing projects or for trips to the market. You can find the Tote Bag pattern in my book "Super Cute Paper Piecing"

I just had to make a zipper pouch with the adorable vintage sewing machine fabric! The Petal Pouch from Noodlehead was the perfect choice! You can find the pattern HERE


Please be sure to tag any projects you make with She Who Sews with the hashtags 

#SheWhoSewsFabric #ILoveRileyBlake #RileyBlakeDesigns

Happy Sewing!

You can see more of my projects and patterns at the following sites:

8.27.2022

Emma Fan Quilt


 Hello!

I had the pleasure of working with the new fabric line "Emma" from Citrus and Mint designs for Riley Blake Designs. The prints are adorable, and from the collection name you can guess the fabric collection is based on the Jane Austen novel "Emma".

The prints include couples dancing, beautiful houses, florals and swallows, to name a few.


I thought that fans were strictly a fashion item but, actually they were used to communicate with a suitor! 

My favorite is "I wish to be acquainted" which would be conveyed by holding the fan in the left hand and covering your face below the eyes. You can find more fascinating facts [HERE]


I had such fun combining pairs of fabric, and a green print to make each fan. The fans are paper pieced and then set on point.


I chose to use the extra fabric from the Fans to create a scrappy backing and binding.

The beautiful fan quilting design was stitched by Ashely of Hen House Quilting.


If you are interested in making your own Fan Quilt, I created a pattern which is available in my Etsy shop Charise Creates.

Happy Sewing!


4.25.2022

Flower Garden Fabric and a FREE Patchwork Tote Pattern

Spring is my favorite time of year.  There is nothing more exciting than anticipating new blooms and having a sunny day to tend to the garden.


When I had the chance to make a project with Flower Garden fabric from Riley Blake Designs I jumped at the chance!  Such a cheery fabric line and the perfect fabric for Spring sewing.

The fabric line is just beautiful with water color florals, ditzy sweet florals and a lovely gingham.


I am  patiently waiting until I can start wearing my Spring clothes as it is still a bit chilly in the Pacific Northwest, and I thought it would be fun to make a tote to complement my Spring wardrobe.

So...... I designed a tote.  The free pattern can be found at the bottom of this post.

 The Patchwork Tote was designed to showcase the lovely Flower Garden Prints.  The patchwork panels make outside pockets and are so handy!  The strap is extra long so it can be worn cross body.

I lined the tote with the largest floral from the collection - Flower Garden Main color Blue.

I love to see the lining peeking out at the top of the tote : )

I used Riley Linen in color Natural for the body and straps of the tote which allows the Flower Garden Prints to shine.

The cute little charm hanging from the pocket loop is from Sunny Day Supply (fun & free gift with purchase)

If you make a project with Flower Garden fabric, be sure to tag your photos on social media with the following hashtags:

#FlowerGardenFabric #ILoveRileyBlake #RileyBlakeDesigns

If you make my Patchwork tote, be sure to also tag your photos with the following hashtags:

#ChariseCreatesPattern #PatchworkTote

Patchwork Tote Pattern 

12" x 12" finished

Fabric - 42" wide

Linen - 1 yard

Body: 2 - 12 1/2" x 12 1/2",  Straps: 2 - 2 1/2" x 36 1/2" ,  Gusset: 1 - 2 1/2" x 35" ,             Pocket Lining: 2 - 12 1/2" x 10 1/2"

Print #1 -  1/2 yard

Lining Body: 2 - 12 1/2" x 12 1/2"

Gusset - 1 - 2 1/2" x 35" 

Print Squares: 7 different prints - F8 (8 1/2" x 22")

56 - 2 1/2" square

2 - A

2 - B

Button Loop:  4 1/2"   x   1 1/4"

Gingham Print -  F4 (18" x 22")

Bias Strips: 2 - 1 1/4" x 13",   2 - 1 1/4" x 2 1/4",  

Fusible Fleece - 1 yard

Pocket - 2 - 12 1/2" x 10 1/2"

Body - 2 - 12 1/2" x 12 1/2"

Gusset - 1 - 2 1/2" x 35"

Medium Wt Interfacing - 1/8 yard

Strap: 1 - 2 1/2" x 36 1/2"


Supplies:

Button - 1/2" or Larger

Charm (for pocket loops)

You can find the pattern for corner pieces A and B [HERE]


1) Make the Patchwork Pocket

Arrange  the 28 print squares,  PLUS 1 - A, and 1 - B pieces that make up the panel, in your desired design.

Stitch each row together.  Press seam allowances in one direction, each row in alternating opposite direction. 

Stitch the rows together, nesting seams. 

Press horizontal seams open.

 Make 2.


2) Fuse the batting to the wrong side of the patchwork panel.  Trim the batting around the corners.

Place the Linen rectangle on the back of the batting, baste in place.  Trim the batting around  the corners.

Quilt diagonal lines on the patchwork panel. 
Repeat for the second panel.


3) Fold the gingham 1 1/4" x 2 1/4" in half wrong sides together. Unfold the strip.  Fold the raw edge to the crease line and press in place.
Fold in half and press.  Edge stitch the open edge.


4)
Form a loop.  Place on the top edge of the pocket.  Baste in place.


5)  Fold the bias strip in half wrong sides together. Press
Unfold the strip.  Fold the raw edge to the crease line and press in place.
Fold in half and press.


6) 
Place the bias binding on the wrong side of the top pocket matching raw edges, Right sides together .  Stitch the bias to the top edge with a 1/4" stitch.


7)
Wrap the bias to the front panel, folding under the raw edge on the fold line.  Edgestitch in Place.

Repeat for the second pocket.


8)
Fuse the 12 1/2" square fusible batting to the wrong side of the 12 1/2" linen square.
Quilt horizontal lines 1" apart.

Place the Pocket on the 12 1/2" quilted linen square.  Baste around the side and bottom edge.  Trim the bottom corners of the linen square.

Make a loop with the  4 1/2"   x   1 1/4" linen strip as Instruction #3.  Place the loop at the top center of one of the panels.  Baste in place.


9) 
Fuse the 2 1/2" x 35" Gusset batting rectangle to the back on the 2 1/2" x 35" Gusset linen rectangle.

(You can quilt the gusset if desired)

Fold the gusset in half lengthwise to find the center point.  Match the center of the gusset to the bottom center of the Purse Panel.  Pin in place.  Pin the gusset to the Panel matching raw edges.

Stitch with a 1/4" stitch.  Repeat for the other side.

Turn right side out and press.

10)
Place pattern piece A and B to the bottom edges of the 12 1/2" Lining rectangles and trim around the pattern pieces.

Make the lining following instructions #7 leaving a 6" opening at the bottom of one side of the lining.


11) Make the Handle:

Fuse the 2 1/2" x 35" interfacing to the wrong side of one linen handle.
Place the Linen  2 1/2" x 35" rectangle right sides together with the interfaced handle.
Stitch each long edge with a 1/4" seam allowance.  Press seams open. 
Turn right side out.  Press flat.
Edgestitch each long edge.


12)
Place the handle on the top gusset edge right side together.  Baste in place.
Place the lining right sides together with the outside tote panel.  
Stitch with a 1/4" seam allowance.
Turn right side out.  Press.

Stitch the top 1/4" from the top edge, stitching through all layers.

Stitch the opening in the lining closed.

Attach a button centered, 1/2" above the pocket edge.

To add a little extra fun, you can add a charm to one or both loops on the pocket.  

Enjoy your Patchwork Tote!